Custom Connector Project Preparation
IFS Connect allows you to develop your own Connect Readers and Senders.This page describes how to prepare a proper project structure to be possible to develop a new Reader or a Sender.
Quick Guide
Short summary over the steps described below that prepare a connector project:
- Create an IFS Developer Studio project and checkout source code from repository (to <project>/workspace).
- Create folder for your connector project somewhere in your component's source structure (<project>/workspace/<component>/source/<component>/.../<my_connector>).
- Create
build.xmlin your connector project folder. - Create source (src) and library (custom-lib) folders.
- Create Free-Form project in NetBeans or IFS Developer Studio by pointing your connector project folder.
- Add necessary libraries to custom-lib folder in your NetBeans project.
Overview
Connector Reader and Sender framework is implemented as a number of POJO Java classes and interfaces ( P lain, O rdinary J ava O bjects, not bound by any special restriction)
To achieve this the custom reader or sender Java source code should be therefore put into a proper ANT project folder structure with a build file capable to compile and build the final JAR file.
Project Preparation
The simplest way to do that is to create a Free-Form Java project in NetBeans (or IFS Developer Studio). A Free-Form project expects an existing build.xml file, so you have to start with preparation of the proper directory structure for the project with such a file. As mentioned the project directory has to be located somewhere in your component structure, i.e. somewhere in the structure of an existing IFS Developer Studio project.
Folder Structure
So start with preparation of a proper folder structure in your component. The examples below are located in component fndint, in folder source/fndint/connectors, within an IFS Developer Studio project ifs-applications. Note also that the example snapshots contain only the important folders.
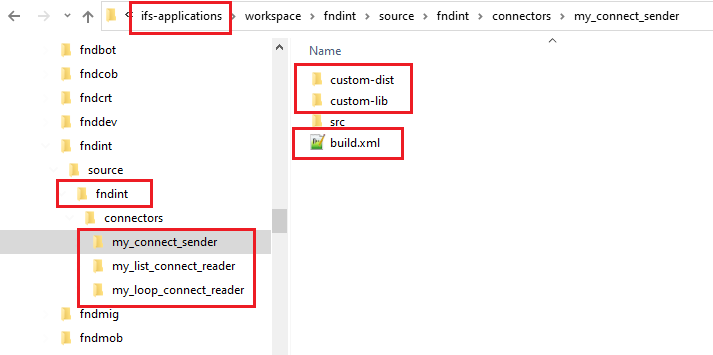
Important files and folders in thecomponentstructure.
When you create a new project in IFS Developer Studio, in that example ifs-applications, the project's top directory will contain, among others, some important subdirectories: nbproject with NetBeans configuration files, custom-lib with specific libraries and workspace containing component directories that you have checked out from the repository. Each component directory contains some subdirectories, among them source/<component_name> with component's source code.
So first create a folder corresponding to your reader or sender project. Create subfolder that is supposed to host the Java source code files (src) and custom-lib folder with required jar files.
Build Script
Next create a build.xml ANT file for your project. Define all necessary properties and targets:
<?xml version="1.0" encoding="UTF-8"?>
<project name="My Connector" basedir="." default="build">
  <description>Builds the project My Connector</description>

  <!-- Properties -->

  <property name="component"    value="fndint"/>
  <property name="development"  value="TRUE"/>

  <property name="src"      value="${basedir}/src"/>
  <property name="lib"      value="${basedir}/custom-lib"/>
  <property name="doc"      value="${basedir}/doc"/>
  <property name="build"    value="${basedir}/build"/>
  <property name="dist"     value="${basedir}/custom-dist"/>
  <property name="jar.file" value="myconnector.jar"/>

  <path id="classpath">
    <fileset dir="${lib}">
      <include name="**/*.jar"/><br/>    </fileset><br/>  </path><br/><br/>  <!-- Targets --><br/><br/>  <target name="all" depends="clean-build"/><br/><br/>  <target name="clean-build" depends="clean, build" description="Clean build"/><br/><br/>  <target name="clean" description="Clean everything"><br/>    <delete dir="${build}"/><br/>    <delete file="${dist}/${jar.file}"/><br/>    <delete dir="${doc}"/><br/>  </target><br/><br/>  <target name="-init"><br/>    <tstamp/><br/>    <mkdir dir="${build}"/><br/>    <mkdir dir="${dist}"/><br/>  </target><br/><br/>  <target name="compile" depends="-init" description="Compile the source code"><br/>    <echo message="Compiling ..."/><br/>    <javac srcdir="${src}"<br/>           debug="on"<br/>           debuglevel="lines,vars,source"<br/>           optimize="yes"<br/>           deprecation="on"<br/>           source="11"<br/>           target="11"<br/>           destdir="${build}"<br/>           includeantruntime="false"><br/>      <compilerarg value="-Xlint:unchecked"/><br/>      <classpath refid="classpath"/><br/>    </javac><br/>  </target><br/><br/>  <target name="build" depends="compile" description="Build the jar file"><br/>    <jar jarfile="${dist}/${jar.file}" basedir="${build}"/><br/>    <delete dir="${build}"/>    <br/>  </target><br/><br/>  <target name="run" depends="build"><br/>    <java classname="ifs.fndint.exampleconnector.classname"><br/>    <classpath refid="classpath"/><br/>    </java><br/>  </target><br/><br/>  <target name="doc"><br/>  </target><br/><br/>
Note: 'lib' folder should contain the libraries needed to build the custom connector. eg:ifs-fnd-connect.jar The 'dist' folder will contain the final built jar file.
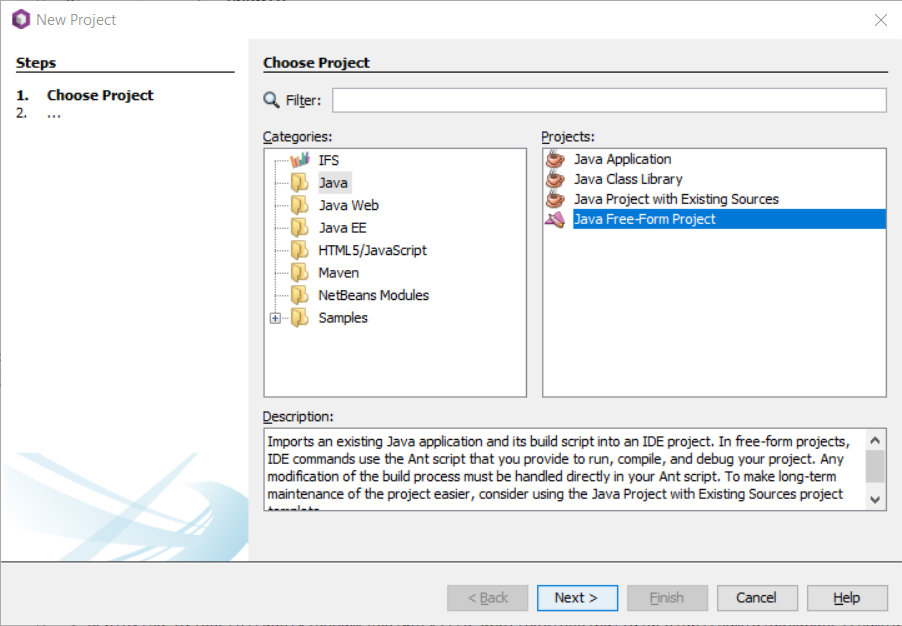
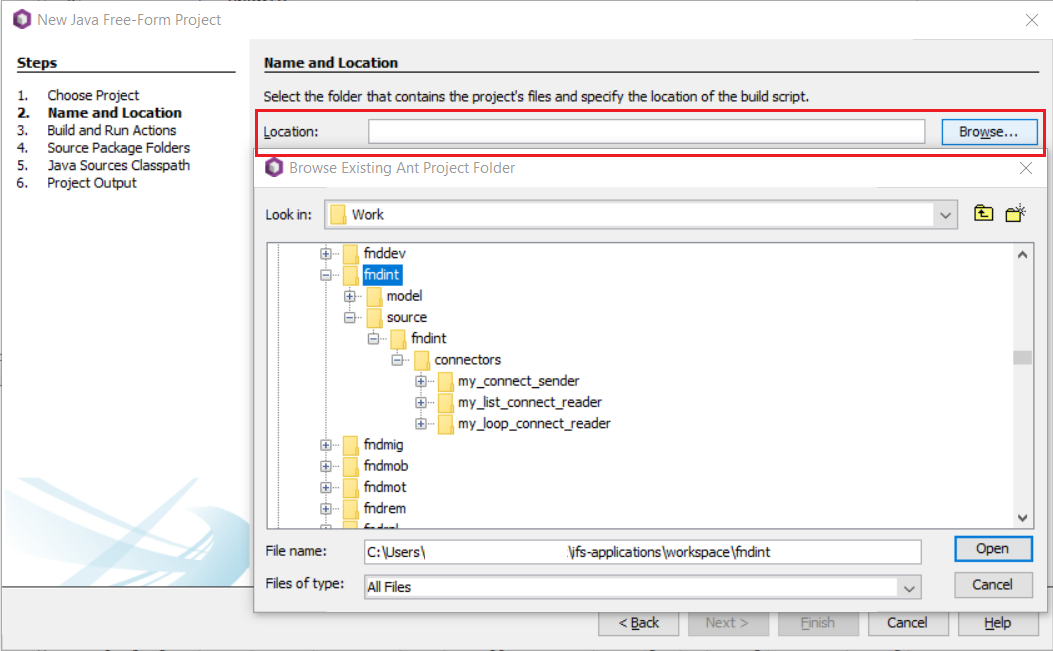
NetBeans Project
Now create a new Free-Form Java project in NetBeans orIFS Developer Studio by pointing out your project folder (the one containing build.xml file):
Add following jars to custom-lib in your NetBeans project:ifs-fnd-common.jar, ifs-fnd-connect.jar, ifs-fnd-connect-ejb.jar, ifs-fnd-j2ee.jar. These jars can be downloaded by clicking on the name of it here. Additionally activation-1.1.1.jar when creating a custom sender. You may add additional jar files if your classes have more dependencies.
Example Projects
This documentation is supplied with some example connector projects, that can be downloaded from. You can just copy one of the examples to your component structure, adapt to your needs and open it in NetBeans or IFS Developer Studio for further development.