Radar Chart
Radar charts can be generated inside page, card, arrange and tab definitions.
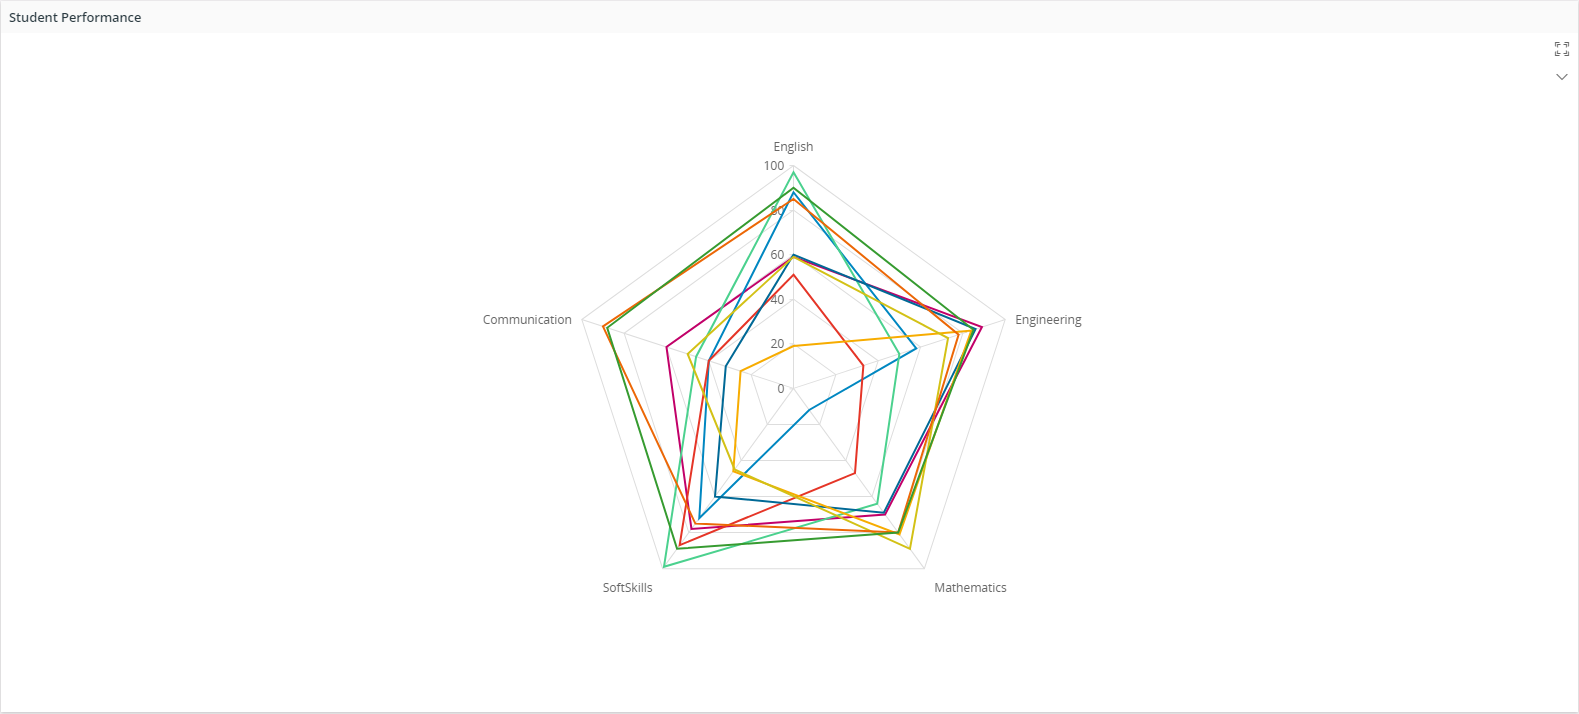
Figure 1 - Radar chart in a page
Variations
None.
When to use
Use a radar chart when you want to display data in multiple dimensions.
How to use
Follow the steps below to add a radar chart to a page.
Basic Radar Chart
First you have to create a data source in the projection file. Then you can connect it to the radar chart as follows.
//---------------Example Code------------------
radarchart StudentMarksChart for StudentEntity {
    ..
}
When it comes to a basic radar chart it needs to have a label, x-axis and y-axis.
- Label: Title of the chart.
- x: Configurations of x-axis (Argument axis) of the chart.
- y: Configurations of y-axis (Value axis) of the chart.
The following code describes how to create a basic radar chart on Aurena pages.
//---------------Example Code------------------
------------- MAIN PAGES ---------------
page StudentMarksPage using Students {
   title = "Student Marks";
   radarchart StudentMarksChart;
}

------------ VISUAL COMPONENTS ----------
radarchart StudentMarksChart for StudentEntity {
   label = "Student Performance";
   x {
      value StudentID;
   }
   y {
      label = "Text for Y axis";
      value SubjectMarks;
   }
}
1. Define a radar chart
Define a radar chart in the client model file using the following format.
//----------------Declarative Syntax------------------
radarchart <radar_chart_name> for <entity_name> {
   ...
}
<radar_chart_name> - identity of the radar chart, always use a meaningful identifier.
<radar_name> - The entity or the summary the radar chart is based on, see examples below:
//-------------Example Code-------------------
radarchart StudentRadarChart for StudentSummary {
   ...
}
2. Add the radar chart to the container
A radar chart can be added to a page, card, arrange, tab. A radar chart gets it's vales from a datasource which is either an an entityset, an array or reference:
//---------------Declarative Syntax------------------
page <page_name> {
    radarchart <radar_chart_name> using <entityset_for_radar_chart>;
 }
<entityset_for_radar_chart> - This is the entityset that serves as the datasource from which the radar chart gets its values. The entityset must be based on the same entity that was used to define the radar chart.
//----------- Example Code Method 1 ----------------
    page StudentMarksInfo using Students {
        radarchart StudentMarksChart using StudentMarksSummarySet;
    }
//--------------Declarative Syntax----------------
    page <page_name> using <entityset_for_page> {
        radarchart <radar_chart_name>;
    }
This method is useful if the purpose of the page is to display a radar chart of records. In such instances it is not mandatory to define an entityset for the radar chart since it gets its values from the <entityset_for_page>.
//-------------Example Code Method 2---------------
    page StudentMarksInfo using StudentMarksSummarySet {
        radarchart StudentMarksChart;
    }
- Add the radar chart to use an array or a reference:
//---------------Declarative Syntax------------------
    page <page_name> using <entityset_for_page> {
        radarchart <radar_chart_name>(<radar_chart_array>);
    }
<radar_chart_array> - This is the array or reference defined in the related projection file.
Most of the time an array or reference is connected to a parent record and needs to be updated when the parent record is changed. In such instances the radar chart needs to be bound to the control which has the parent record, for example a selector or a list. The binding is done using the bind keyword.
//---------------Declarative Syntax------------------
page <page_name> using <entityset_for_page> {
    selector <selector_name>;
    radarchart <radar_chart_name>(<radar_chart_array>) bind <selector_name>;
}
//---------------Example Code Method 3--------------
page StudentClassPage using StudentClassSet {
    selector StudentClassSelector;
    radarchart StudentsRadarChart(StudentsArray) bind StudentClassSelector;
}
- Add the radar chart to use a function that returns an entity collection:
//---------------Declarative Syntax------------------
    page <page_name> {
        list <radar_chart_name> using <function_set>;
    }
<function_set> - This is the function defined in the related projection file that returns an entity collection. A function should return the same type of entity collection as the radar chart is based on. Function parameters can get values from several places like the current record of the page, global context, search context, etc.
//-------------Example Code Method 4---------------
page StudentClassPage using StudentClassSet {
    selector ServiceInvoiceSelector;
    radarchart StudentsRadarChart using GetStudents(ClassID);
}
Adding a radar chart to a card
The below code snippets would show how radar chart could be integrated to a card (Only referenced radar chart could be generated).
(Parent-Child relationship [1-M])
//---------------Example Code------------------
card CardName for SomeEntity {
    radarchart RadarChartName(ChildArrayName);
}
3. Configuring radar chart axes
A radar chart has two axes. Two axes can be defined using x and y properties in marble.
Following is a simple code snippet that shows the way of defining two axes in marble.
//---------------Example Code------------------
radarchart RadarChartName for RadarChartEntity {
   label = "Title of Radar Chart";
   x {
   }
   y {
   }
}
'x' represents the argument axis and 'y' represents the value axis.
- value: The attribute which offers values to the axis.
//---------------Example Code------------------
x {
   value StudentID;
}
y {
   value SubjectMarks;
}
4. Adding values to radar chart
X axis can only have one value. Y axis can have more than one value. A simple single series radar chart can be defined as follows.
//---------------Example Code------------------
radarchart StudentMarksChart for StudentEntity {
   label = "Title of Radar Chart";
   x {
      value StudentID;
   }
   y {
      value SubjectMarks;
   }
}
Multiple Series
When it comes to multiple series radar charts y axis can have multiple values.
//---------------Example Code------------------
y {
    value EnglishMarks;
    value MathematicsMarks;
    value SoftSkillsMarks;
}
Each 'value' attribute in y-axis represents one series.
5. Set the appropriate properties for the radar chart
Set one or more properties for the radar chart such as label, collapsed etc. For a complete radar chart of the properties and how to set them see the Properties section below.
6. Setting custom colors on radar chart
Using emphasis property, a chart area of a radar chart can be colored. Following is an example image.

Figure 3 - Using emphasis on radar chart
There are two ways that you can use to color radar charts. Although emphasis property has to be used in both ways.
- Using the chart emphasis property.
//---------------Example Code------------------
radarchart RadarChartTest for ExampleRadarChart {
    label = "Title of Radar Chart";
    x {
        value XValueFieldName;
    }
    y {
        value YValueFieldName;
    }
    emphasis Complementary1 = [XValueFieldName = "Expression"];
    emphasis Complementary3 = [YValueFieldName = "Expression"];
}
- Using the emphasis property inside value.
//---------------Example Code------------------
radarchart RadarChartTest for ExampleRadarChart {
    label = "Title of Radar Chart";
    x {
        value XValueFieldName;
    }
    y {
        value YValueFieldName {
            emphasis Complementary1 = [ValueFieldName = "Expression"];
        }
    }
}
7. Transposed Radar Chart
In case a radar chart has to be implemented for a dynamic system where the categories may change overtime, following version version would be more suitable for it.
//---------------Example Code------------------
radarchart StudentMarksChartTransposed for StudentEntity {
   label = "Student Marks";
   transposed = [true];

   x {
      value StudentID;
   }
   y {
      value English;
      value Engineering;
      value Mathematics;
      value SoftSkills;
      value Communication;
   }
}
Keyword transposed is optional and it�s default value is false. By setting transposed to true you are telling that your series are defined in �y� instead of in �x�, so each �y� value becomes a series identifier.
To understand it properly check out the following images.
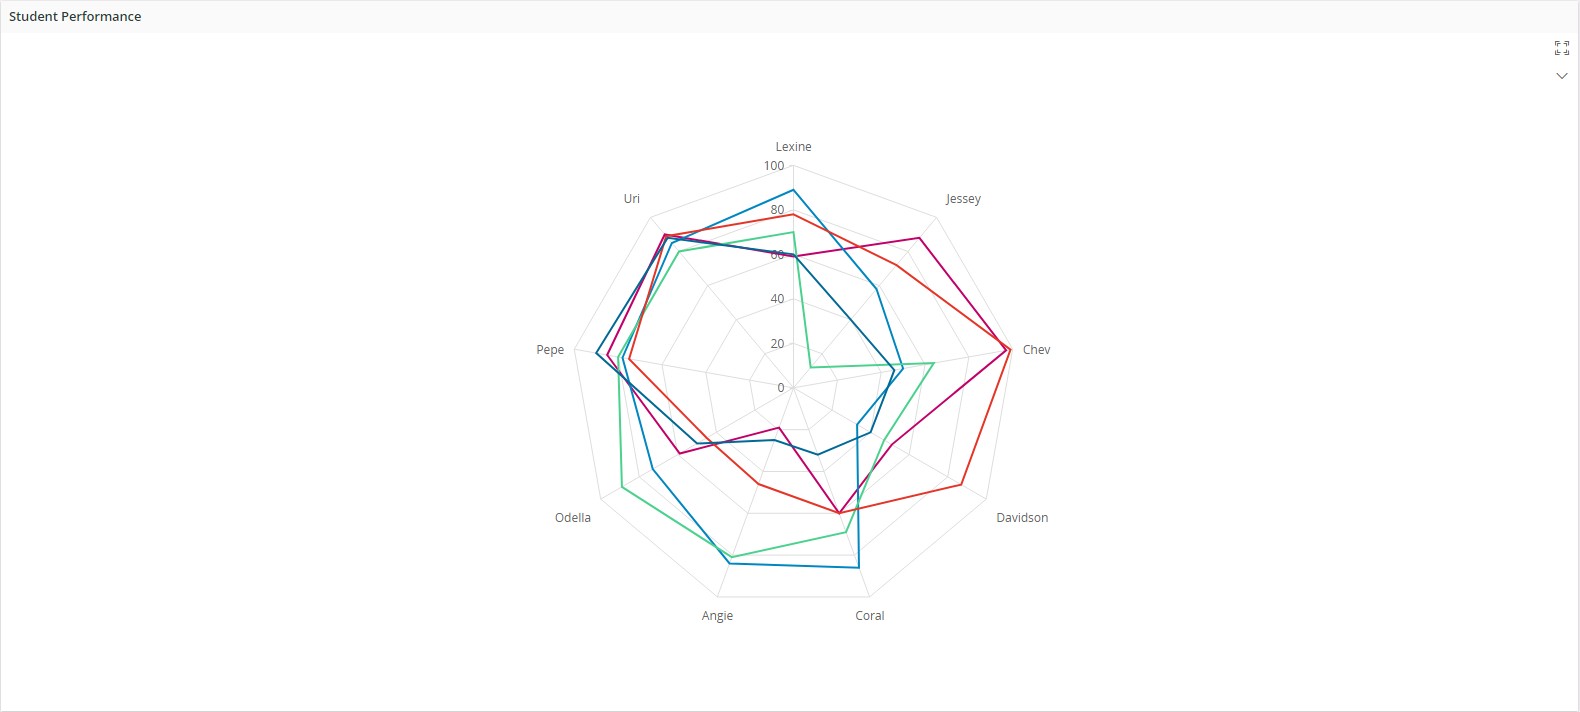
Figure 3 - Transposed radar chart
Figure 4 - Not transposed radar chart
Both of the above charts share a single data set and the only difference in the syntaxes being the transposed property which has been used in the first chart syntax but not in the second one.
9. Navigate to details
You can implement this in chart leveland it will impact across all the series in a chart.
//---------------Example Code------------------
    page StudentMarks using Students {
        title = "Student Marks";
        radarchart StudentMarksRadarChart {
            details = StudentInfoPage(StudentID);
        }
    }
radarchart StudentMarksRadarChart for StudentEntity {
    x {
        value StudentID;
    }
    y {
        value Engineering;
        value Mathematics;
        value SoftSkills;
        value Communication;
    }
Using this syntax you can specify the page to be navigated together with the parameters that need to be passed.
Also there's another way of specifying a pages to navigate. You can use a navigaiton URL for that. The following is an code example of that.
//---------------Example Code------------------
    page StudentMarks using Students {
        title = "Student Marks";
        radarchart StudentMarksRadarChart {
            details = "page/StudentRecord/StudentInfoPage?$filter=StudentID eq $[STUDENT_I_D];
        }
    }
10. Using commands in radar chart
With this functionality, it is possible to execute custom commands on selected data points. A data point is single record bound and has an associated record behind. Same as in Navigate to Details, it is possible to access all the attributes of the associated record upon a click. Following is a basic implementation of custom commands in charts.
//---------------Example Code------------------
radarchart StudentMarksRadarChart for StudentEntity {
   label = "Cost Summary Graph";
   x {
       value Category;
   }
   y {
       value Count;
   }
   command StudentInfoCmd;
}

command StudentInfoCmd for StudentEntity {
   label = "Student Info";
   execute {
      navigate "page/StudentRecord/StudentInfoPage?$filter=StudentID eq $[StudentID]";
   }
}
11. Using page search context for filtering chart datasource
Page search context values can be used in charts for filtering chart data source. This has to done when adding a chart into a page. The following is a code example implementation of it.
//---------------Example Code------------------
page StudentClassPage using Students {
   searchcontext PageSearchContext {
      defaults = GetPageSearchContextDefaults();
   }
   radarchart StudentsRadarChart using Students {
      filter = [ClassName = PageSearchContext.ClassName];
   }
}
12. Modify settings in radar chart
With this functionality it is possible to further configure chart and modify chart metadata. The following is a code example implementation of it.
radarchart StudentsRadarChart using Students {
   enablesettings = [true];
}
13. Using chart search context for filtering
Chart search context values can be used in charts for filtering chart data source. The following is a code example implementation of chart level search context.
page EmployeesPage using Employees {
radarchart EmployeesRadarChart using getEmployees(ChartSearchContext.<PARAM1>, ChartSearchContext.<PARAM2> ) {
searchcontext ChartSearchContext {
defaults = GetChartSearchContextDefaults();
}
}
}
Properties
Below is a list of properties that can be used to customize the control.
collapsed | details | emphasis | filter | label | visible | searchcontext
Examples
1. Transposed Radar Chart
//---------------Example Code------------------
radarchart RotatedChart for YourEntity {
  label = "Current VS Goal";
  transposed = [true];

  -- Categories
  x {
    value SkillName;
  }

  -- Series in the chart
  y {

    value Competency {
     label = "Current level";
    }

    value Goal {
     label = "Ultimate goal";
     emphasis Complementary1 = [true];
    }

}
Example 1 - Transposed Radar Chart
2. Using chart level emphasis
//---------------Example Code------------------
radarchart StudentMarksChart for TestAcwilkStudent {
   label = "Student Performance";
   x {
      value Name;
   }
   y {
      value English;
      value Engineering;
      value Mathematics;
      value SoftSkills;
      value Communication;
   }
   emphasis Complementary4 = [Name = "Davidson"];
}
Example 2 - Radar chart using Chart Level Emphasis
3. Using series level emphasis
//---------------Example Code------------------
radarchart StudentMarksChartTransposed for TestAcwilkStudent {
   label = "Student Performance";
   transposed = [true];
   x {
      value Name;
   }
   y {
      value English {
         emphasis Complementary4 = [true];
      }
      value Engineering;
      value Mathematics;
      value SoftSkills;
      value Communication;
   }
}
Example 3 - Radar chart using Seried Level Emphasis